Tax ID Stamp Website: https://www.tabc.texas.gov/services/alcohol-excise-taxes/tax-id-stamps/
Overview
The Texas Alcoholic Beverage Commission (TABC) provides serialized stamps to Local Distributor Permit (LP) holders to place on bottles of distilled spirits. Local distributors must place these stamps on containers before selling the product to retailers that hold one of the following types of licenses:
- Mixed Beverage Permit (MB)
- Private Club Registration Permit (N)
- Private Club Exemption Certificate Permit (NE)
This article will describe how to track the TABC stamps in Cloud Retailer to remain compliant with the guidelines set for the state of Texas. If you have any questions unrelated to the processes in Cloud Retailer, please see the References section below for the TABC contact information.
Creating a Stamp Collection
The first thing you should do once you receive your tax ID stamps is create a virtual collection in Cloud Retailer.
- Log into your back office
- Navigate to Admin > Tabc Tax Stamp
- Click the Create New Stamp Collection button
- Select the location that received the stamps
- Enter the 2 letter prefix from all the stamps
- Enter the starting stamp number without the prefix
- Enter the number of stamps received
- Note: These come in increments of 80, 500, and 10,000
- Enter the date when you received the stamps
- Click the Save button
- Return to the previous tab
- Confirm the report's Start number and End number are accurate
Deleting a Stamp Collection
There are times when an entire stamp collection must be returned, in this case, the stamp collection should be deleted in Cloud Retailer. The data for all used stamps will remain intact, but the unused stamps will have their status updated to "Returned".
- Log into your back office
- Navigate to Admin > Tabc Tax Stamp
- Select the row matching the stamp collection you returned
- Click on the Delete Selected Stamp Collection button
- Click the OK button to proceed with deleting the collection
- Note: This can't be undone
Destroying a Single Stamp
There are times when a single stamp must be physically destroyed, and Cloud Retailer's digital record should match.
- Log into your back office
- Navigate to Admin > Tabc Tax Stamp
- Click on the Destroy Single Stamp button
- Enter the stamp number in the text field
- Click the Destroy button
- Note: The stamp will be destroyed immediately after pressing the Destroy button, so make sure the stamp number is correct before proceeding.
Making a Club Order with TABC Stamps
- Log into your POS
- Search for the Club's customer account by pressing the Lookup Customer or Club Customers button
- Click on the row in the search results for the Club
- Click the Select button to add them to the transaction
- Scan an item's barcode to add it to the transaction
- If the item is a distilled spirit, attach a TABC stamp to the bottle
- In Cloud Retailer, press the Set TABC Stamp button
- If the task pad button is not configured with the prefix for your current group of stamps , manually type the letter prefix into the prompt
- Scan the TABC stamp into the prompt
- Verify the number in the field matches the stamp
- Press the Set button
- Repeat step 5 for every item until the order is complete
- Tender the transaction
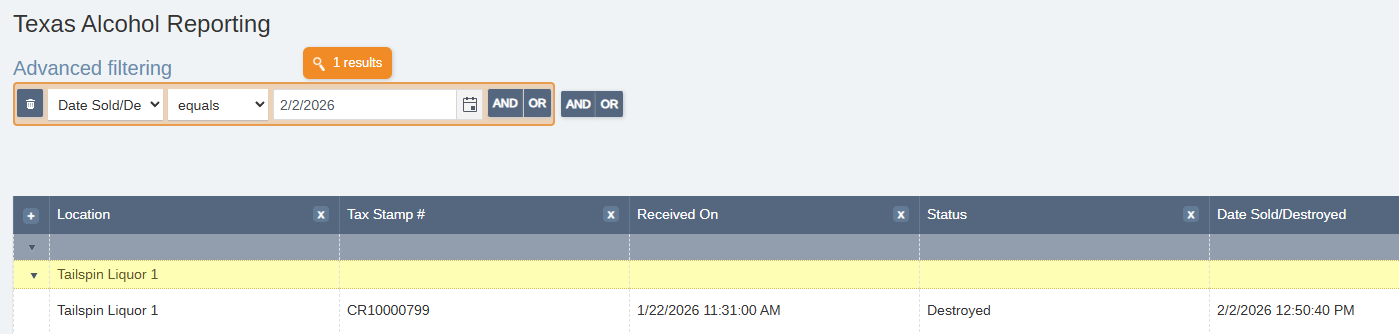
Looking Up a Used Stamp
There will be times when the state or your customer will require information regarding a specific stamp. This information is stored in the Texas Alcohol Reporting report. This report allows you to search for a stamp by its number or within a time period.
- Log into your back office
- Navigate to Reports -> Texas Alcohol Reporting
- Enter the date the stamp was sold or destroyed
- (Optional) To search by the stamp number, change this filter from Date Sold/Destroyed to Tax Stamp #
- Press the magnifying glass to perform the search
References
- https://www.tabc.texas.gov/services/alcohol-excise-taxes/tax-id-stamps/
- Contact TABC at idstamps@tabc.texas.gov or 512-206-3341
Was this article helpful?
That’s Great!
Thank you for your feedback
Sorry! We couldn't be helpful
Thank you for your feedback
Feedback sent
We appreciate your effort and will try to fix the article